I am a firm believer in the pursuit of new ideas to better our future. And where is the best place to find and nourish new ideas? In the minds and souls of new people of course :) Many of my lessons are aimed to show that though we are all given the same simple instructions, there are infinite outcomes. What works for one may not work so well for another. As many of us as there are, there are that many different ways to be and to live in this world. I hope to show my students how to be conscious, creative, confident choice makers, excelling independently as well as in collaboration with others. As I see it, Art may be the best way to practice these such skills and to bring these new people and their ideas to the table.
All Hands On Deck was a project I did with each of my First and Second Grade classes at CWC. There are approximately 20 students in each class, 3 classes per grade, so the outcome of this project was at least 120 AMAZING and diverse masterpieces.
Materials Used: Butcher paper, pencils for tracing, oil pastels, tempera paint, each other, critical thinking, and our forearms.
Here's a lil' taste of our Album of the Day: Wings Wildlife. Enjoy!
Day one.
I began the lesson by pairing off the students. Often this results in some pretty dramatic responses from the kids. Whether they are excited, humiliated, nervous, or absolutely enraged with who I have paired them with, the restlessness in the room inevitably escalates.
I encouraged them to be courteous with their reactions so as not to hurt feelings and that whomever their partner may be, they alone would be responsible for their own project and their own choices. I explained that it was necessary to have a partner during this lesson simply because we could not very well trace ourselves. Essentially your partner was simply another tool, but that you should use them wisely and treat them well. Once their job was done, you would be on your own.
Step One
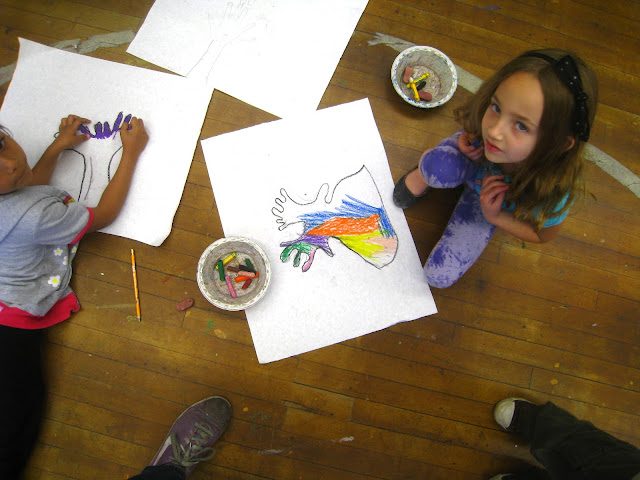
Arrange both your right and left forearm (elbow to fingertips) into a shape of your choice. Then lay them onto your paper so that your partner can trace your shape... (it is your job to be patient and to verbally guide your partner's hand if you need to). Then switch.

I encouraged them to transform their body so that it might be unrecognizable. This resulted in some pretty interesting forms...
Step Two
Once you have your shape, and your partner has theirs, outline the shape so that it is clear and enclosed. Then help yourself to your choice of oil pastels and fill in your shape however you please!
(It should be noted that whenever i say anything like, "however you please," "do what you want," or "make your own choice", my students have an understanding that I need to them be thoughtful and to take their time so that I, and everyone else can see that they put care into their marks. I try and stay away from asking them to simply "slow down", because that is not entirely what i want. There are some people who can work at quite a quick pace and still demonstrate care. However in order to give something care it often means to go at a slower pace, especially for children. All I ask them to do is respect their art and their practice of mark making, at all times :)
To begin the next phase of the project I needed the kids to brainstorm as many adjectives as they could about all of the work they had seen the day before...
There were colorful shapes, and simple shapes... busy, beautiful, quick, scary, funny, wild, ugly,silly, black, blue, big, small, stripes, dots, dark, light, bright, fun, boring, exciting, etc., etc. The idea here was to simply have them look with their eyes, expand their minds about describing something and how many different ways there are to do so. Once we had filled the board with adjectives in my chicken scratch. I spoke with them about the word CONTRAST: comparing in order to show unlikeness or differences...
Step 3
Return to your piece and decide what words would be used to best describe what you see, then think of words that might demonstrate a contrast to that. If you feel your drawing is bright and busy maybe a contrasting feeling would be dull and simple. If you feel your drawing is big and stripy, a contrast to that might be small and blocky. Your interpretation of each adjective and how you represent it is up to you. You are to finish your piece by filling in the rest of your paper with paint in a way that might contrast your original shape. What you decide to do is up to you. But again take your time and be thoughtful with your marks...
(Although the idea of Contrast was introduced it was merely a way to help inspire the students and their choices. It was not a rule. You will see that some applied the idea and others did not.)
Below are but just a few of the many, many Masterpieces. Note that with the same simple instructions every one is different. You may see some ideas that were shared among students, but you will never find two just alike...
Ta-da!
*Thanks for visiting and come see what else we've been up to real soon*
*Thanks for visiting and come see what else we've been up to real soon*


